Manual testing – Classic
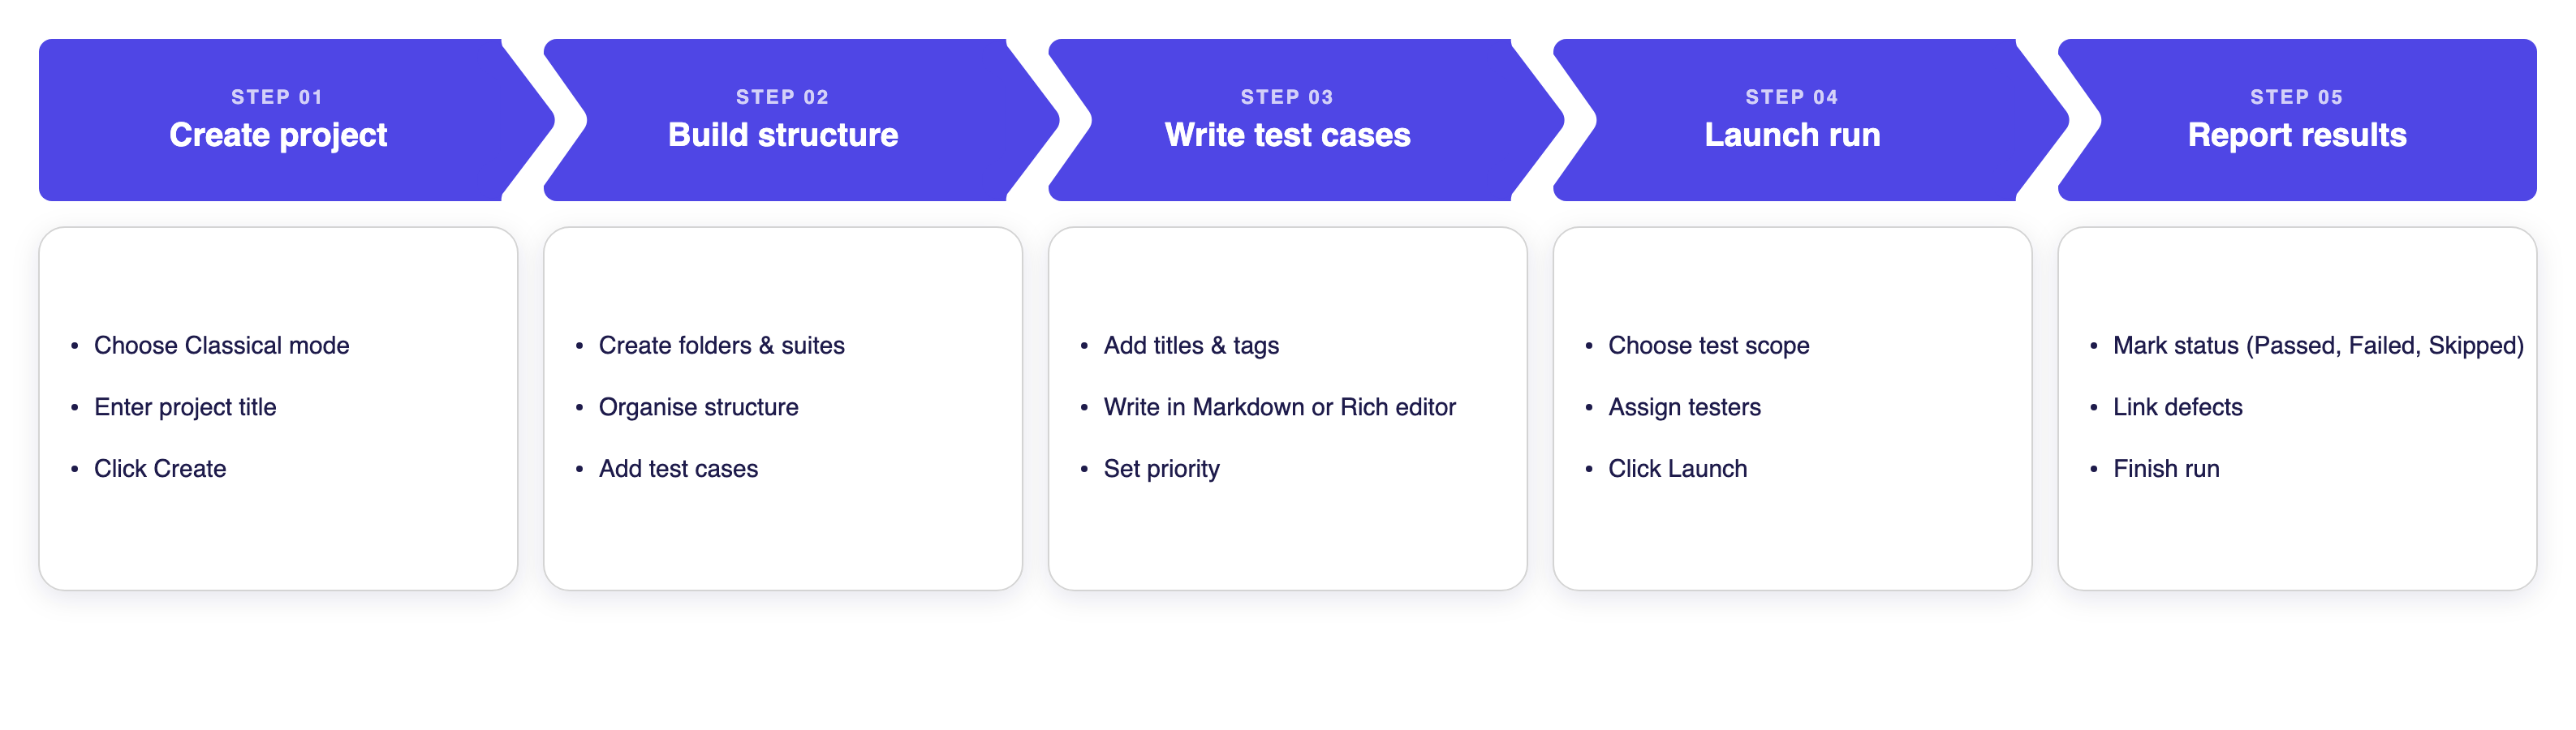
Testomat.io supports two approaches for manual test design: Classic and BDD.
The Classic approach stores test descriptions in Markdown format. It suits teams that write freeform test cases — steps, expected results, preconditions — without a strict Gherkin structure. Use the Classic approach when your tests are written in plain language and you want full flexibility in how you describe them.
The BDD approach uses Gherkin syntax (Given / When / Then) and is the right choice when your team follows behaviour-driven development or shares scenarios between manual and automated tests.
This tutorial covers the Classic approach: from creating a project to finishing a run and reporting bugs.
How to Create a Project
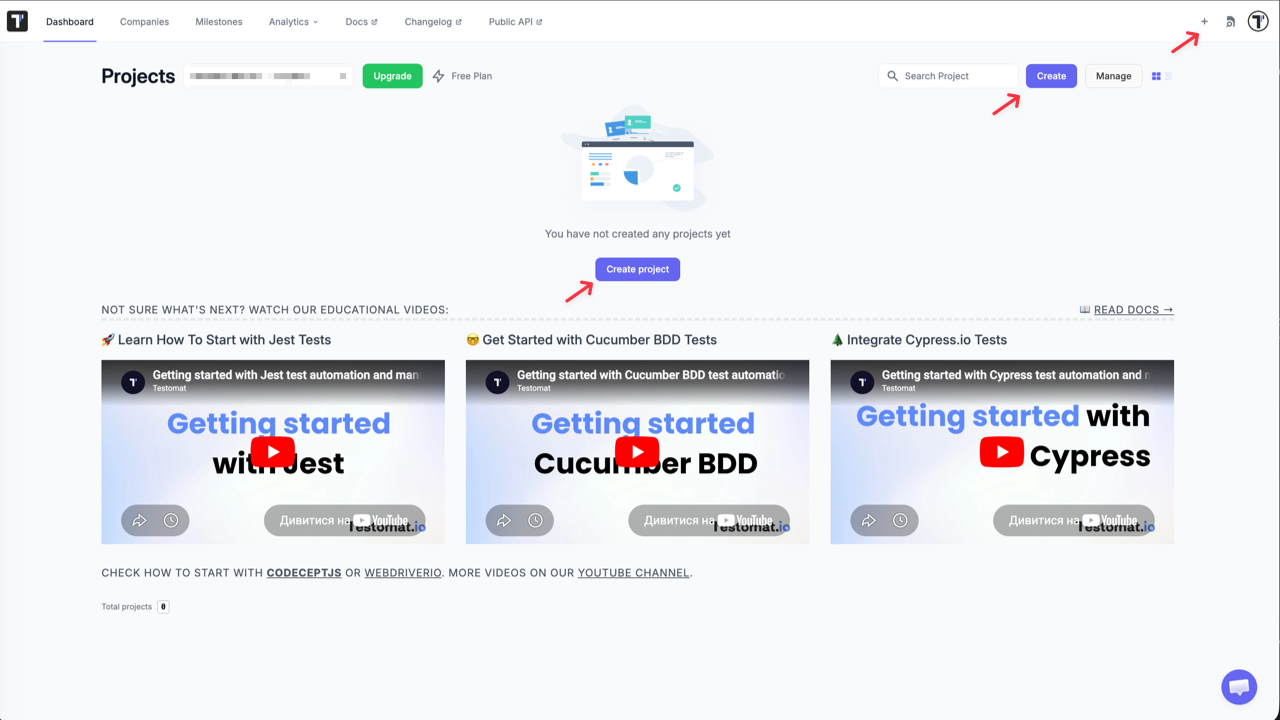
Section titled “How to Create a Project”- Open the New Project form using one of the following options:
- Click the + icon in the top-right corner
- Click the Create button on the dashboard
- Click Create project if you have no projects yet
- Select Classical.
- Enter a name in the Project Title field.
(Optional) Enable Fill demo data to pre-populate the project with sample test cases.
- Click Create.
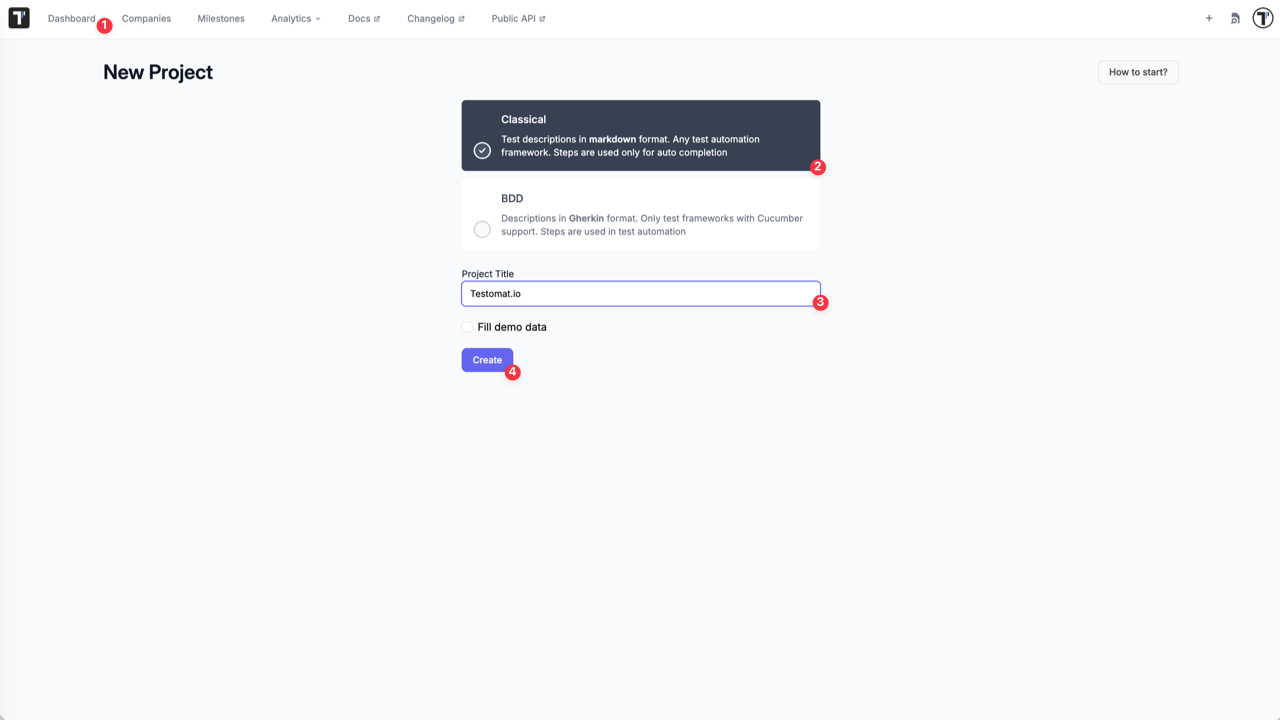
Testomat.io creates the project and opens the Tests page with a README panel on the right. Close the panel to start working.
How to Set Up Folders and Suites
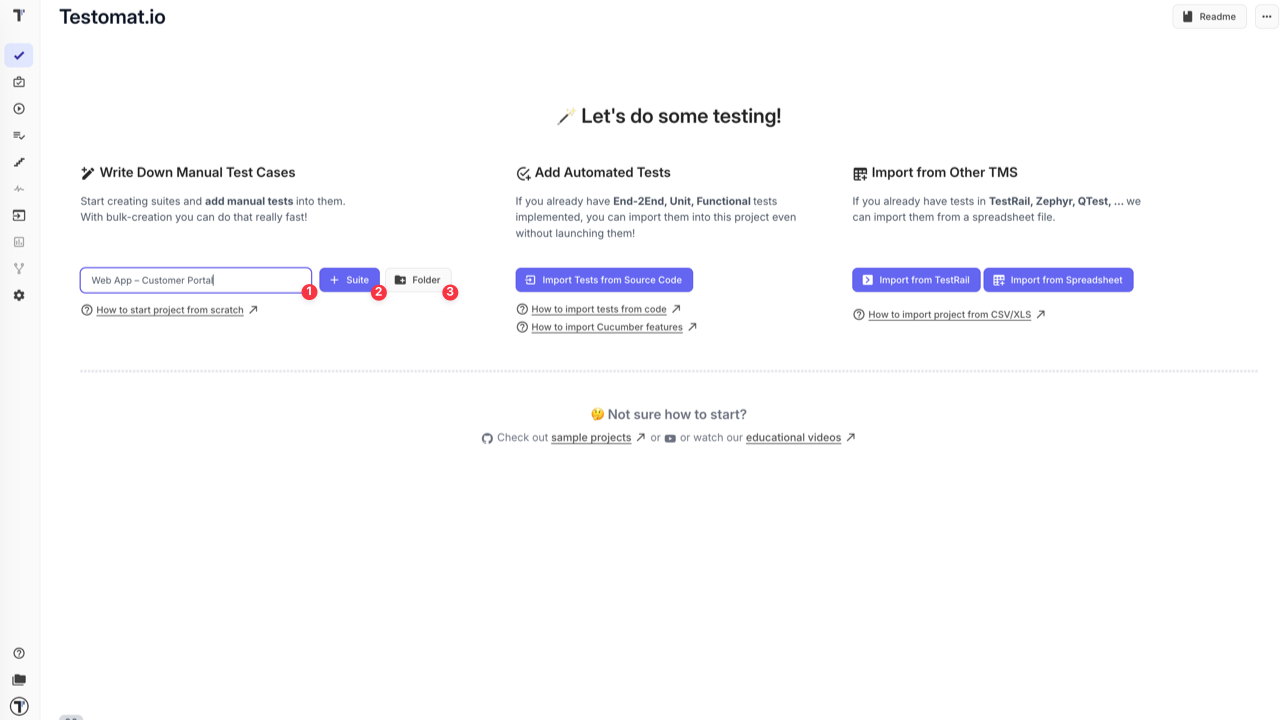
Section titled “How to Set Up Folders and Suites”Project└── Folder └── Folder └── Suite └── Test Case└── Suite └── Test CaseOn the Tests page, enter a name in the input field, then click:
- + Suite — to create a suite at the root level
- Folder — to create a folder at the root level
The folder or suite appears in the test tree. Use the New folder and New suite links to continue building your structure:
- Next to a folder or suite — to create nested items inside it
- At the root level — to add more folders or suites at the top level
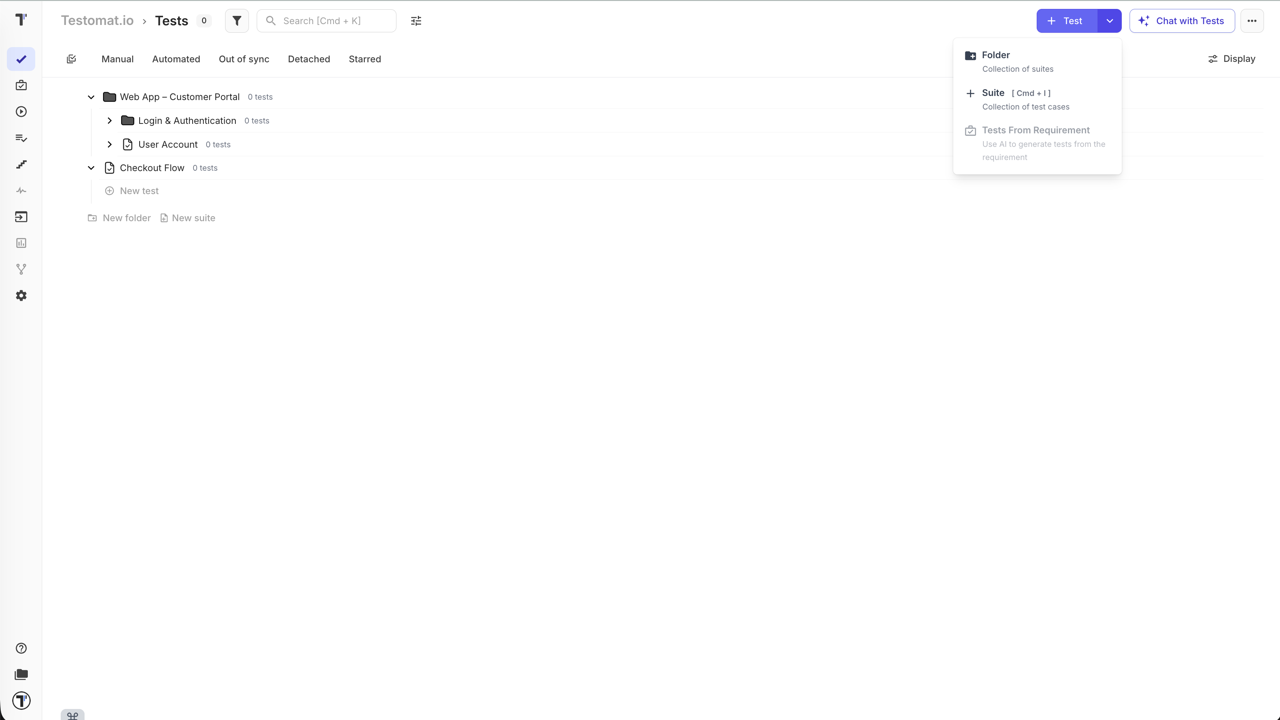
You can also click the + Test button in the top-right corner and select:
- Folder — to create a folder
- Suite — to create a suite
Once your structure is in place, open a suite to start adding test cases.
How to Create and Edit Test Cases
Section titled “How to Create and Edit Test Cases”This section covers creating test cases manually. You can also import tests from source code, spreadsheets, or other TMS tools — see Import for other ways to add tests.
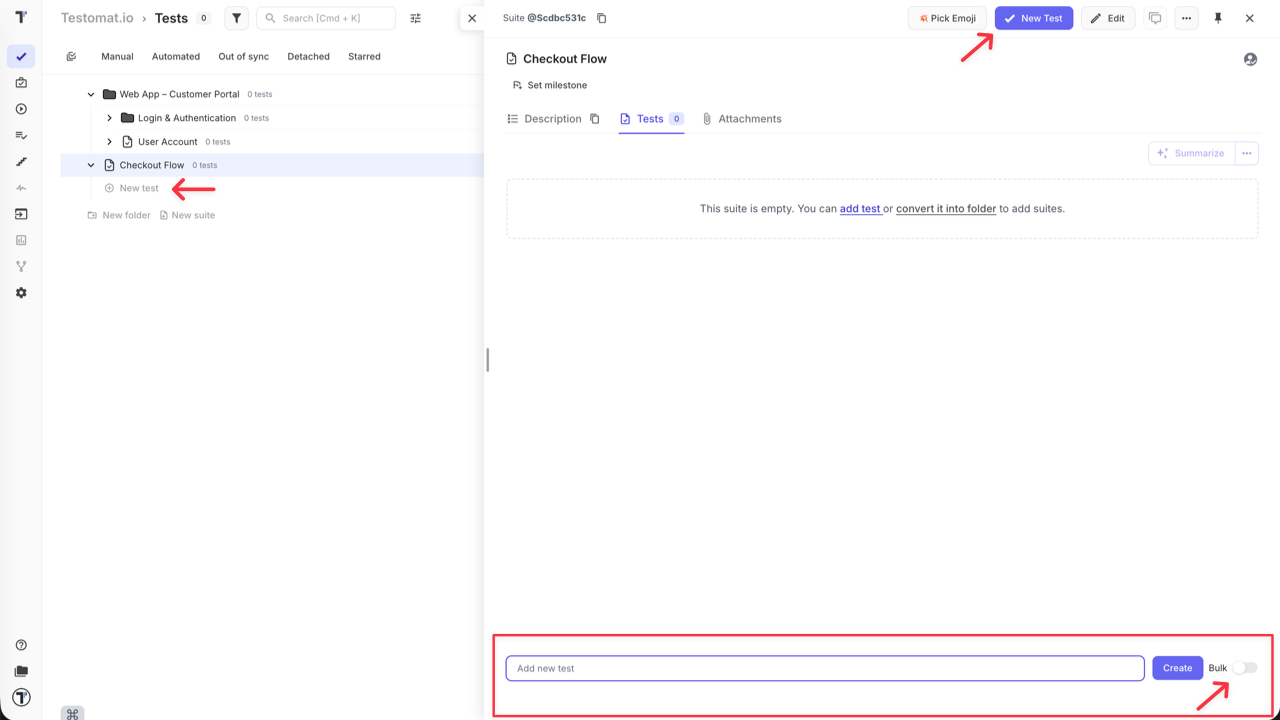
Open a suite to start adding test cases. There are several ways to work:
- New test in the tree — add a test title directly without opening the suite
- Add new test field in the suite sidebar — enter a title and click Create
- Bulk toggle — paste multiple test titles at once, one per line
- New Test button in the top-right — opens the full test editor to fill in all details right away, including priority
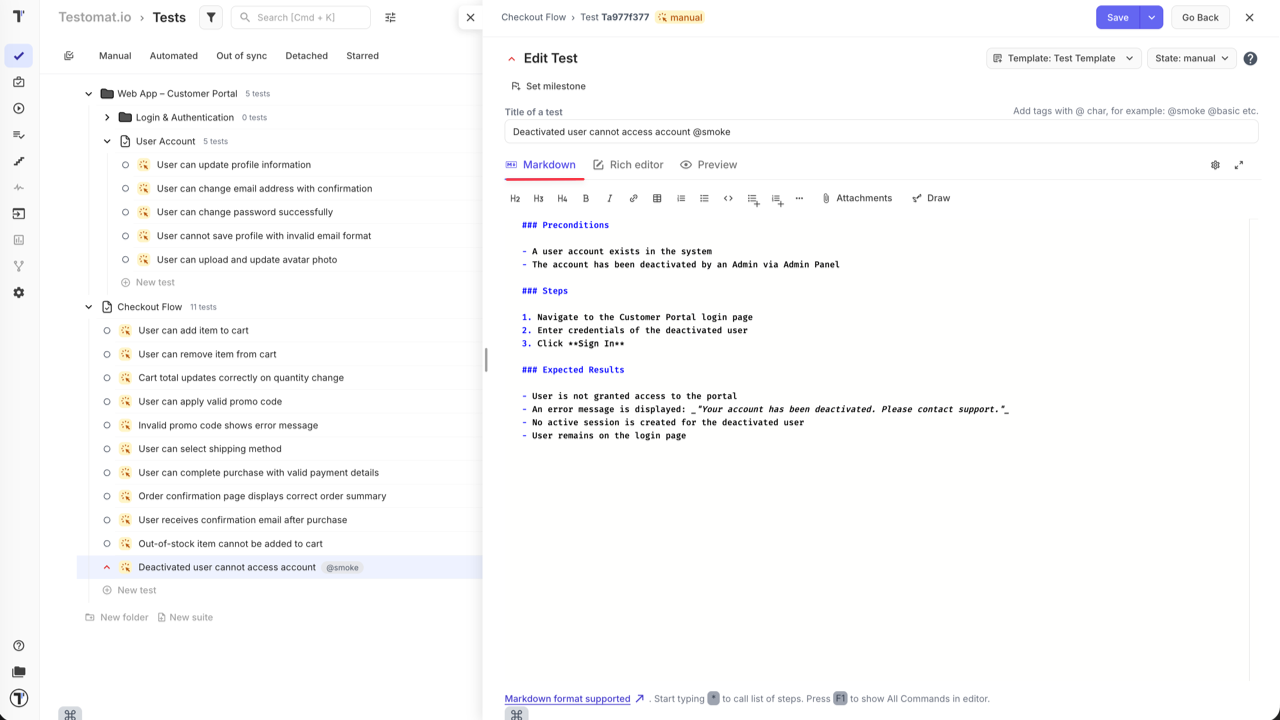
Once a test is created, open it to edit. Add tags in the title using @ (for example @smoke). Write the test content using one of two modes:
- Markdown — write steps, preconditions, and expected results using Markdown syntax directly
- Rich editor — structured editor with dedicated Step and Expected result fields; use
/to insert content blocks (steps, snippets, headings)
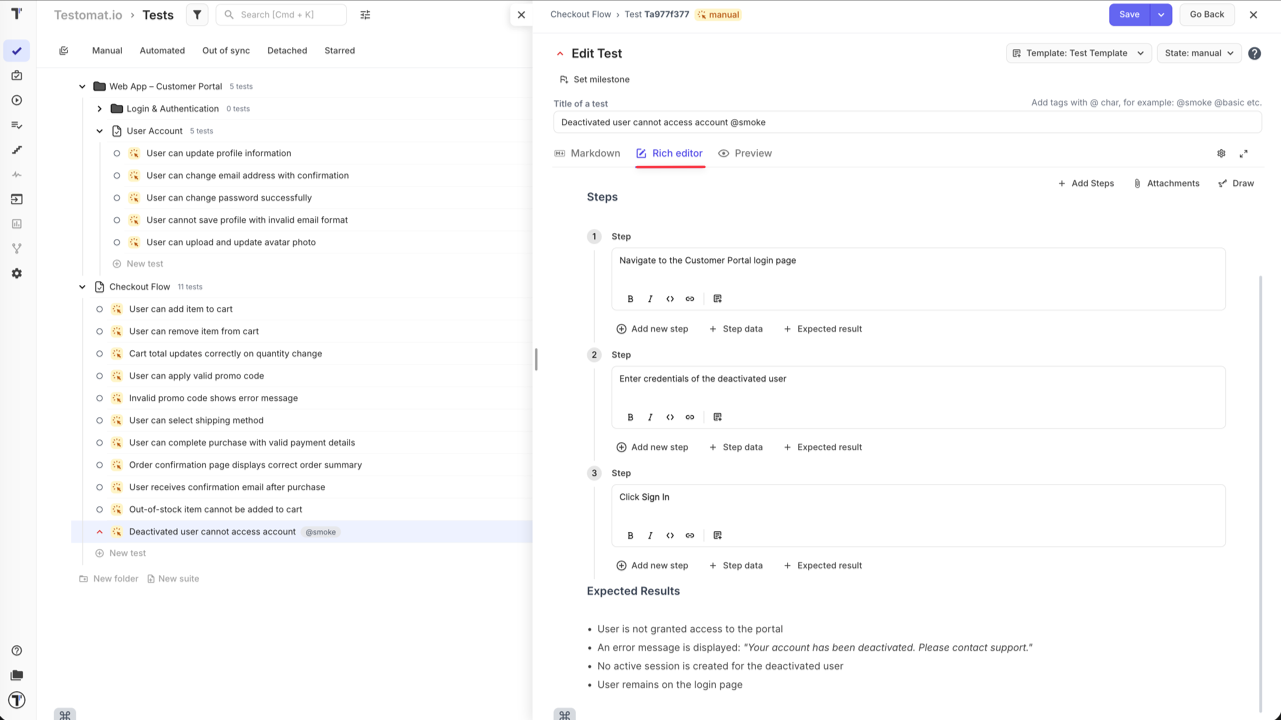
Both modes work with the same content — switching between Markdown and Rich editor never loses or changes your test. Choose whichever feels more comfortable to write in. Use the Preview tab to see how the content will render.
For a full reference of editor features, see Test Case Creation and Editing.
How to Launch a Manual Run
Section titled “How to Launch a Manual Run”Once your test cases are ready, you can launch a manual run to start executing them.
From the Tests page — the fastest way to start a run without leaving your test tree:
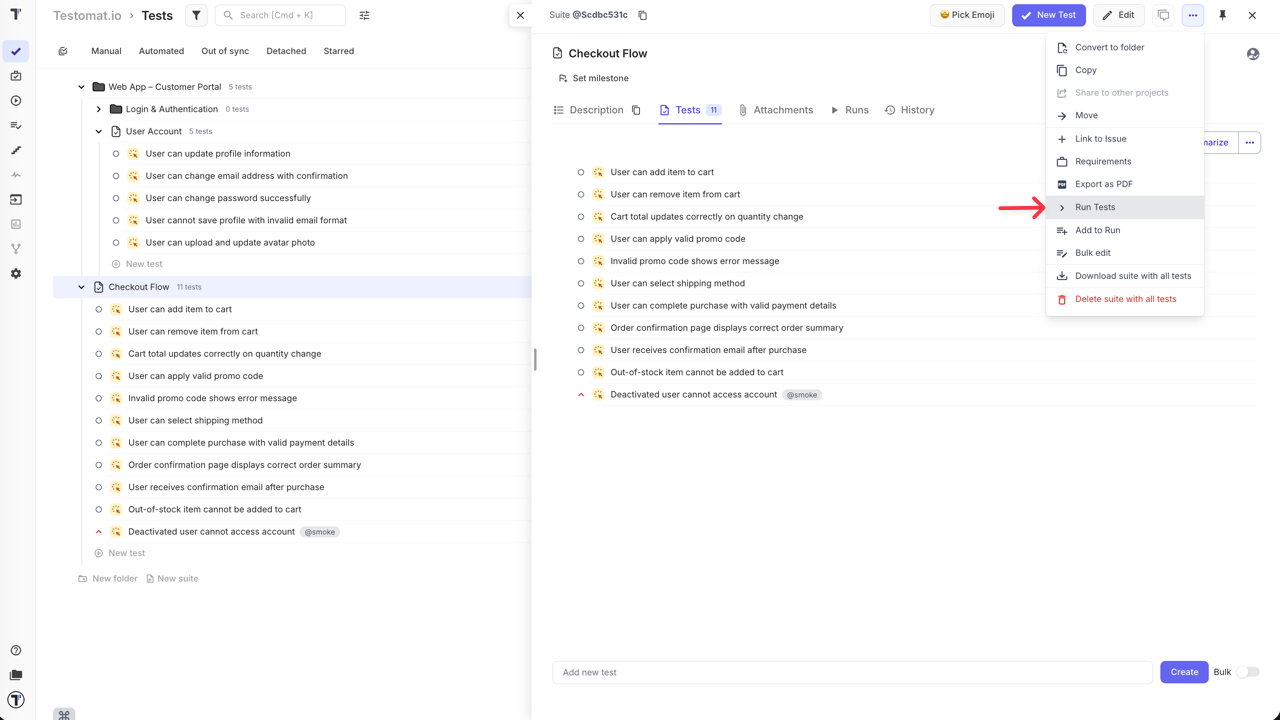
- Run a specific suite — click the extra menu (…) next to a suite and select Run Tests
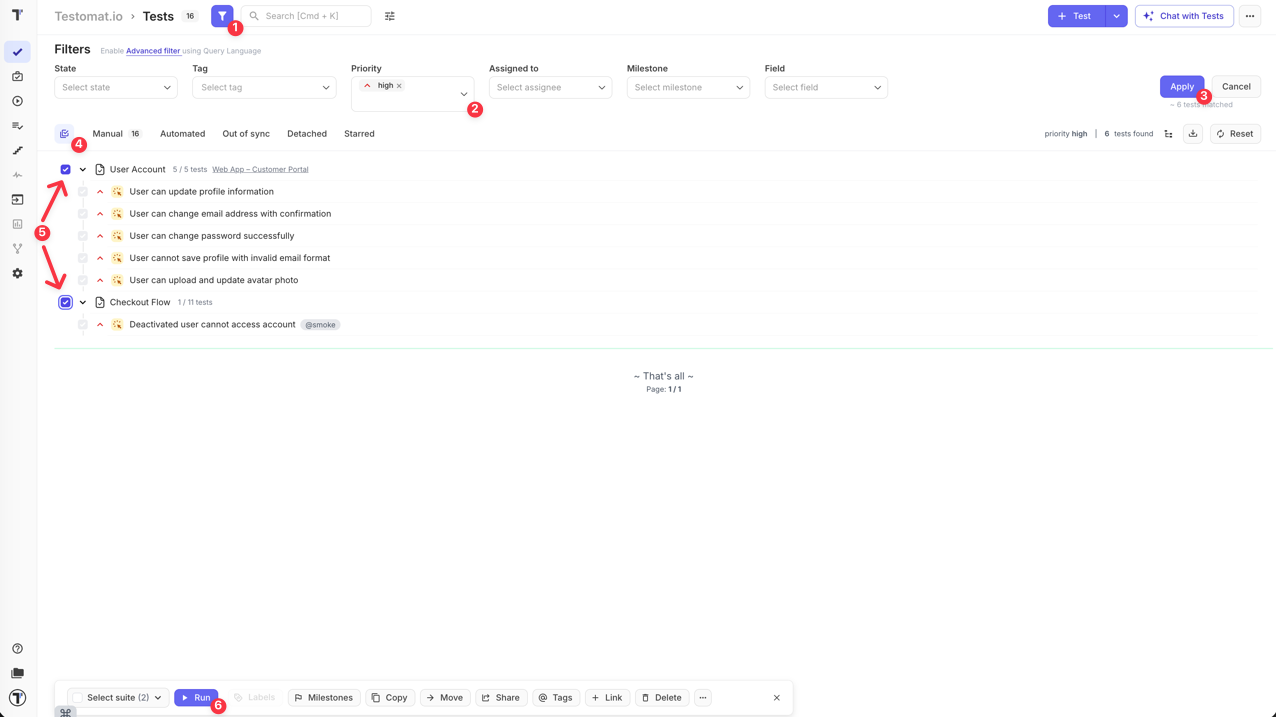
- Filter and run — use the filter panel to narrow tests by priority, tag, assignee, or other fields, then select the results and click Run in the bottom action bar. No test plan needed.
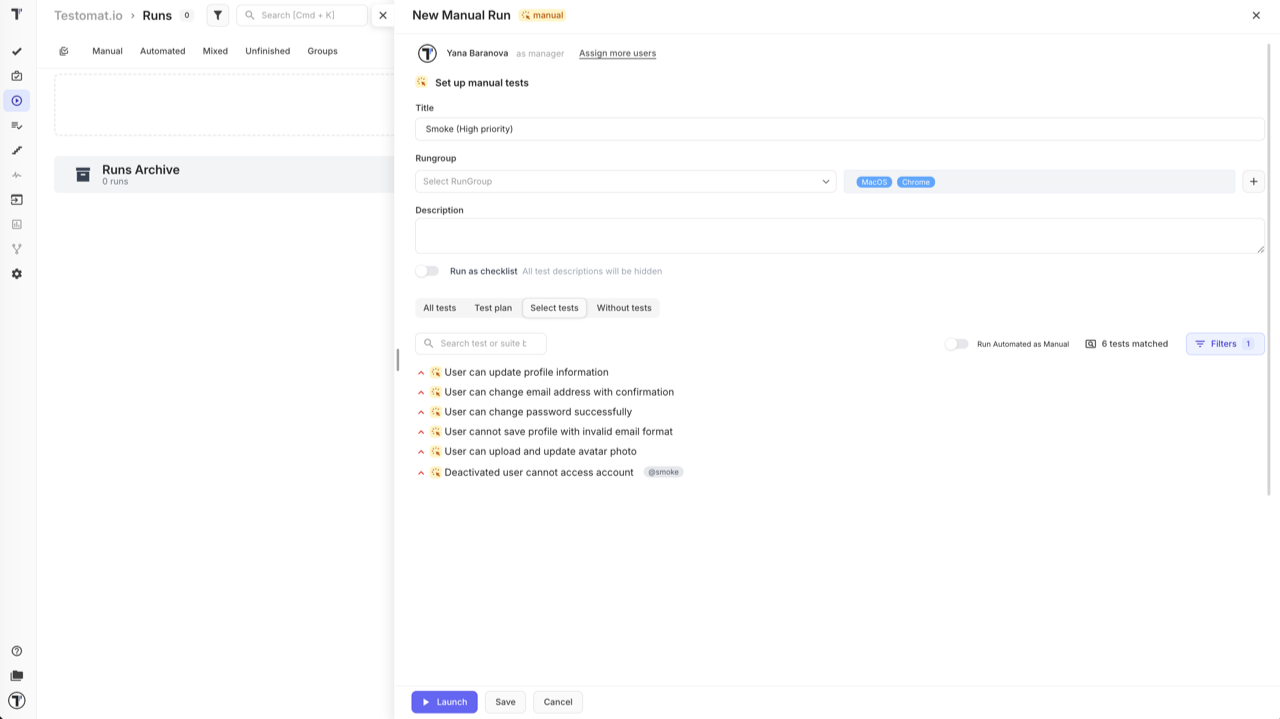
From the Runs page — use this when you need more control over the run. Click Manual Run to open the setup panel.
The key advantages over launching from the Tests page:
- Assign testers — distribute tests across team members; see How to Assign Users to the Run
- Rungroup and environment — organise runs and track results by environment; see How to Run Tests in Rungroups and How to Select a Test Environment
- Run as checklist — hide test descriptions for faster execution; see How to Run Tests as Checklist
- Test scope — choose what to include:
- All tests — all manual tests in the project
- Test plan — use a saved plan (see Plans)
- Select tests — pick tests manually from the tree, or use filter collections to include/exclude tests by priority, tags, assignees, milestones, labels, and more; see How to Configure a Manual Run
- Without tests — create the run structure and populate it later
- Save without launching — store the run and come back to it later
For the full run setup reference, see Running Tests Manually.
How to Execute Tests in a Manual Run
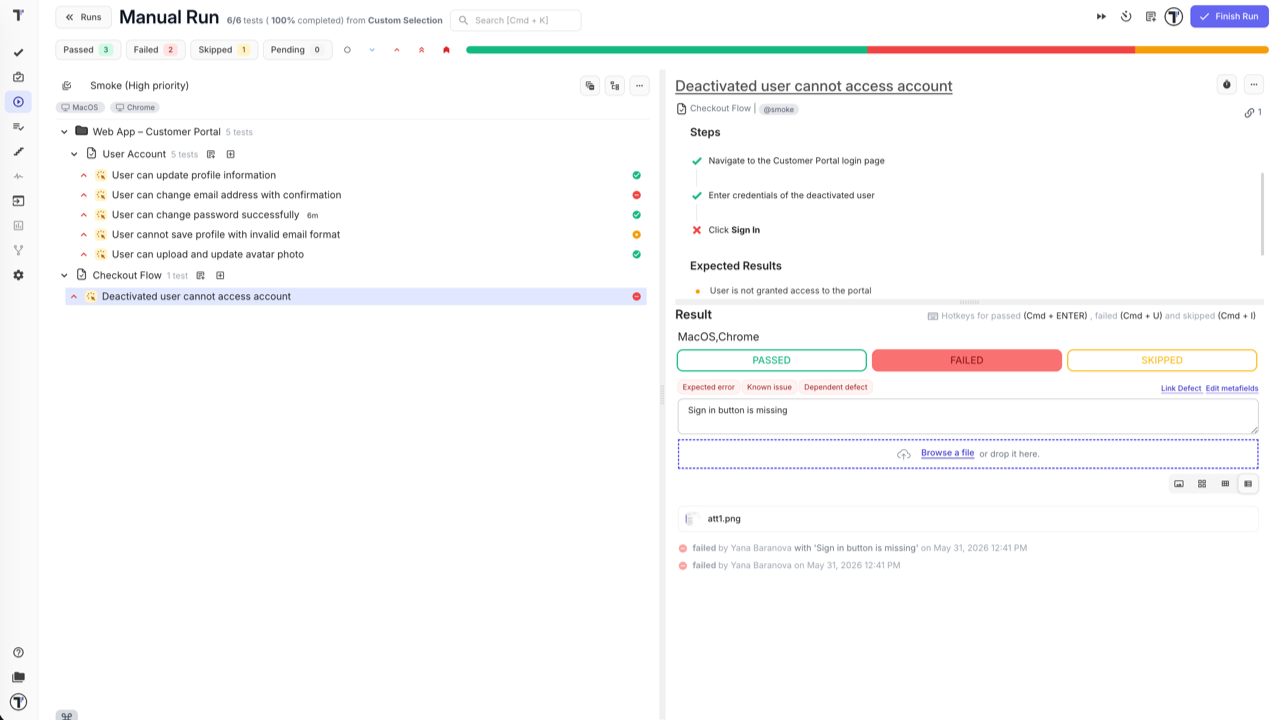
Section titled “How to Execute Tests in a Manual Run”Once the run is launched, select a test case from the left panel and review its steps and expected results on the right.
Mark the result:
- Passed —
Cmd+Enter(Mac) /Ctrl+Enter(Windows) - Failed —
Cmd+U(Mac) /Ctrl+U(Windows) - Skipped —
Cmd+I(Mac) /Ctrl+I(Windows)
For failed tests, add a comment to describe the issue, attach a file as evidence, and use:
- Link Defect — connect an existing bug ticket
- Edit metafields — add extra context
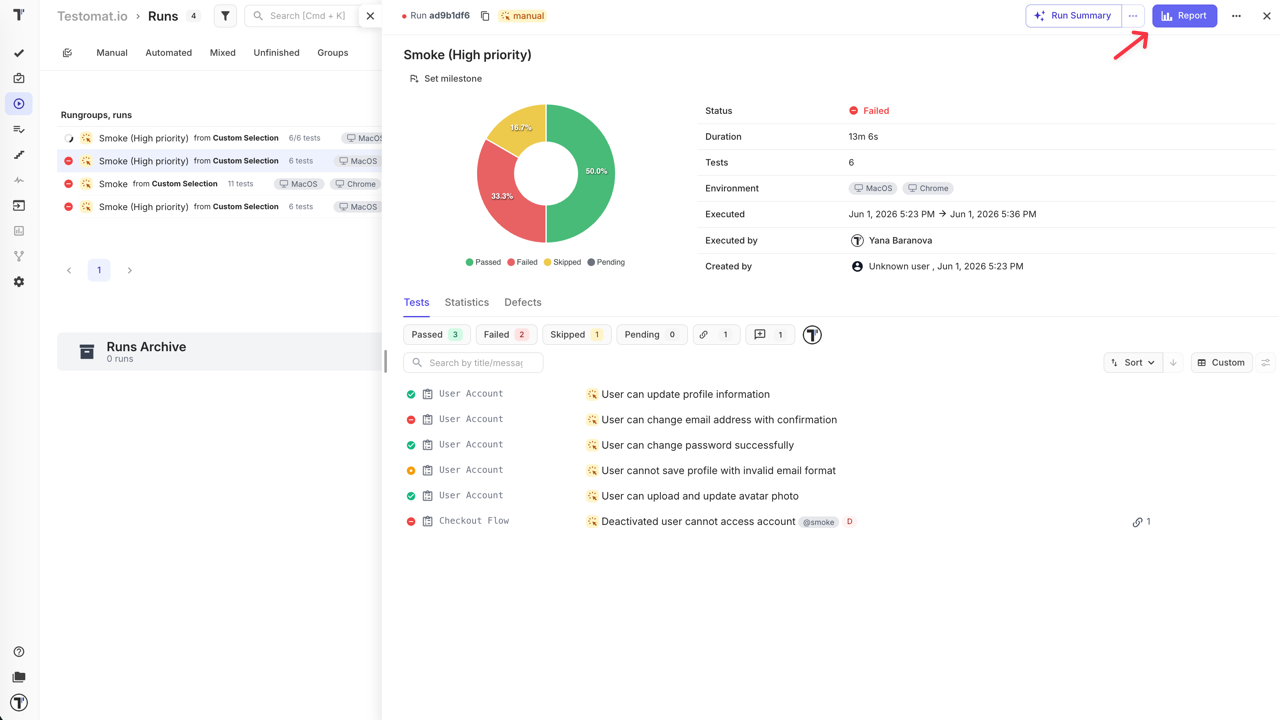
The progress bar at the top tracks Passed, Failed, Skipped, and Pending counts in real time. When all tests are done, click Finish Run.
For checklist mode, step-by-step execution, and time tracking, see Running Tests Manually.
How to Report a Bug from a Run
Section titled “How to Report a Bug from a Run”The most common practice is to report a bug right when a test run fails — without leaving the run. When you mark a test run as Failed, the Link Defect action appears. Use it to:
- Link an existing issue — connect the test run to a bug ticket already in your tracker
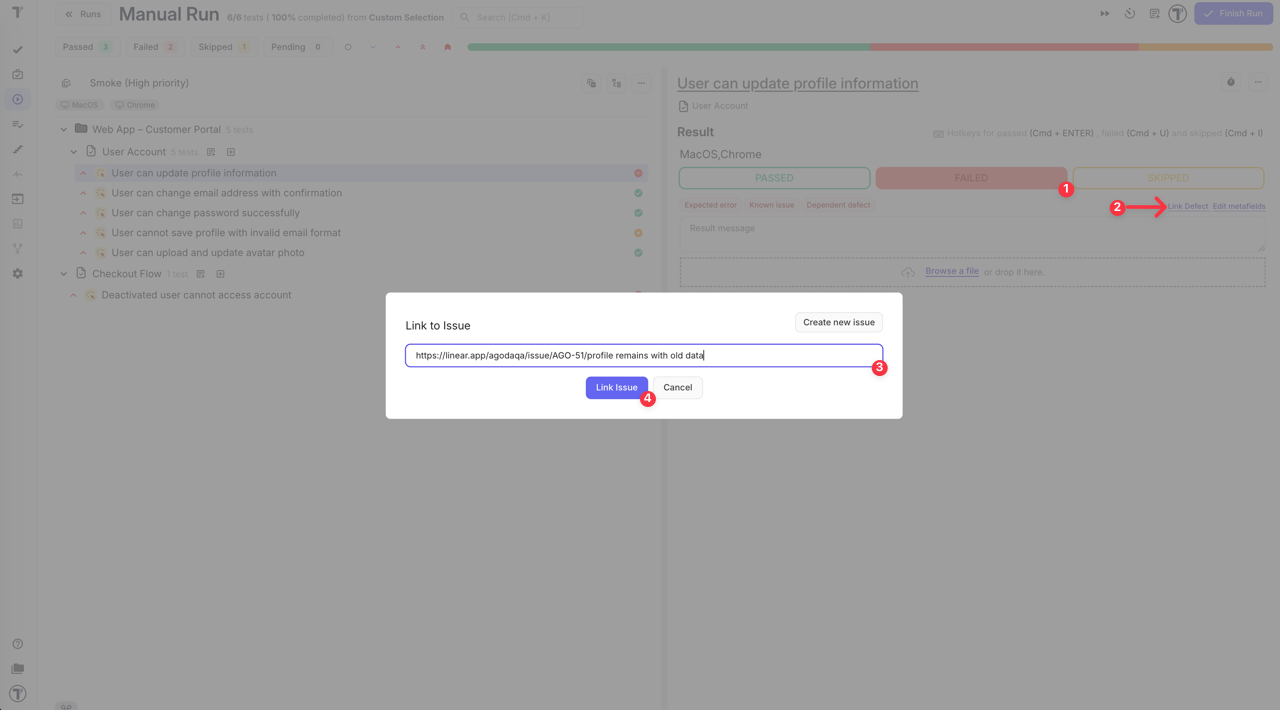
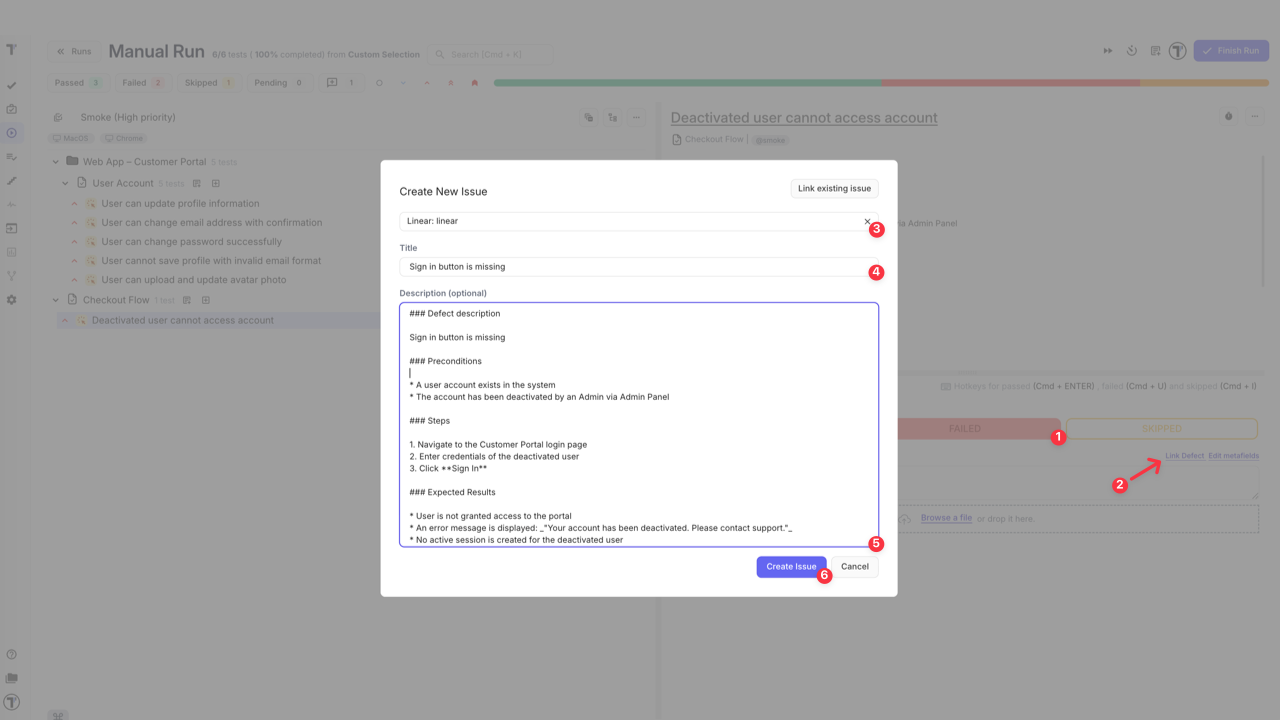
- Create a new issue — the issue modal opens with the title and description pre-filled from the test case content (preconditions, steps, expected results); select the integration, adjust details if needed, and click Create Issue. The content is pulled from the test template — see Templates
The linked ticket is attached to the test run and visible in the run and the run report.
You can also link or create an issue after the run is finished — in the run report, hover over a test run to reveal the + and link icons, and use the same options.

How to Export and Share the Run Report
Section titled “How to Export and Share the Run Report”After completing a run, open the run report and click the Report button in the top-right corner.
From there you can:
- Export as PDF — download a formatted summary for archiving or sprint reviews.
- Download as spreadsheet — export results as XLSX for further analysis.
- Share by email — enter one or more email addresses; recipients get a link to the extended report view.
- Share publicly — generate a public URL with an optional passcode and expiration date for stakeholders who do not have a Testomat.io account.

For full details on public sharing settings, see Run Reports.
Go Further
Section titled “Go Further”These features fit into the Classic workflow at any stage — use the ones that work for your team:
- Templates — define a default content structure so every new test case starts with the right format; see Templates
- Tags & Labels — organise tests with tags and custom fields for flexible filtering and reporting; see Tags & Labels
- Steps & Snippets — extract repeated step sequences into reusable blocks so updates apply everywhere at once; see Steps & Snippets
- Test plans — save a reusable test scope and launch consistent runs without reselecting tests every time; see Plans
- Environments — tag each run with the environment it targets to keep results comparable; see Environments
- TQL — build precise queries to select tests by any combination of tags, priority, assignee, status, and more; see TQL
- Notifications — set up alerts for run results via Slack, email, or other channels; see Notifications
- Analytics — track test coverage, run history, and team progress across the project; see Analytics